
Home Blog

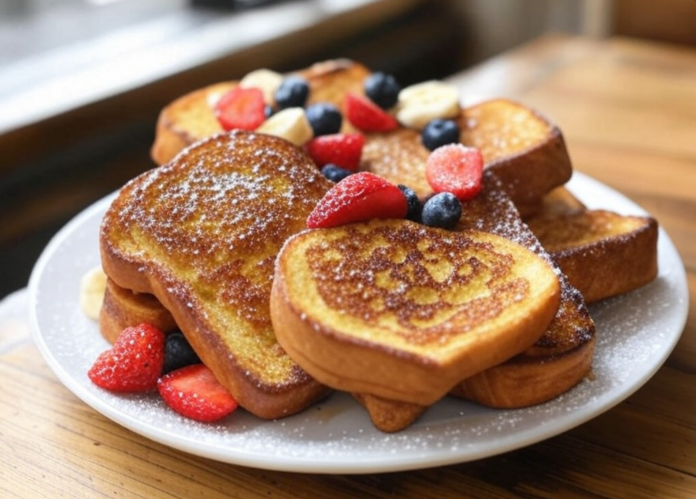
Quick Baked French Toast

0

Quick Baked French Toast

Hello, friends! Welcome back to Haley's Kitchen. If you are looking for a breakfast that feels like a fancy hotel morning but takes only ten minutes to pull together, this Quick Baked French Toast is your new secret weapon. There is something so magical about pulling a golden, gooey casserole straight out of the oven; it's warm, comforting, and perfect for feeding a crowd when you don't want to stand over a stove flipping eggs one by one.
I love making this on busy weeknights because I can prep everything the night before. Just whisk your eggs and milk, slice your bread (I highly recommend slightly stale sourdough or thick-cut brioche), and toss it in the mixture. Then, pop it in the fridge overnight. In the morning, you simply bake until that top is bubbling and caramelized. One tip that makes a real difference: don't skip the vanilla extract! It binds the flavors together and gives that classic custardy taste that plain milk just can't achieve.
Prep Time 15 minutes
Cook Time 35 minutes
Total Time 1 hour
Servings: 8 servings
Course: Brunch
Cuisine: American
Calories: 380

Ingredients
  

For the Custard Base:
  • 8 large eggs eggs
  • 1 ½ cups whole milk or your favorite dairy-free alternative whole milk
  • ¼ cup heavy cream optional, but makes it extra rich heavy cream
  • 2 teaspoons pure vanilla extract pure vanilla extract
  • ¼ teaspoon salt salt
  • â…” cup granulated sugar granulated sugar
For the Assembly:
  • 1 loaf about 20 slices thick-cut French bread, sourdough, or brioche thick-cut French bread, sourdough, or brioche
  • 2 tablespoons unsalted butter softened unsalted butter
  • ½ teaspoon ground cinnamon ground cinnamon
For the Crunchy Topping:
  • ½ cup dark brown sugar packed dark brown sugar
  • ¼ cup all-purpose flour all-purpose flour
  • ¼ teaspoon ground nutmeg optional ground nutmeg
  • 1 pinch sea salt sea salt

Method
 

  1. Prep the Bread:
    First, cut your bread into thick slices (about ½-inch). If you have time, toast them lightly in a toaster or oven to dry them out slightly; this prevents the bread from getting soggy and ensures a great texture. Place the slices in a large baking dish (9x13 inches works best) and arrange them snugly together.
  2. Make the Custard:
    In a medium bowl, whisk together the eggs, milk, heavy cream, vanilla extract, and salt until fully combined and slightly frothy. Pour this liquid evenly over the bread slices in your dish. Use your hands or a spatula to gently press the bread down so every piece is soaked.
  3. Prepare the Topping:
    In a small bowl, mix the brown sugar, flour, nutmeg (if using), and sea salt until well combined. Set aside.
  4. Bake:
    Preheat your oven to 350°F (175°C). Bake the French toast for about 25–30 minutes, or until the custard is just set in the center and the edges are bubbling. The top should look slightly puffed.
  5. Add the Crunch:
    Sprinkle the brown sugar mixture evenly over the top of the hot French toast. Return it to the oven for another 5–8 minutes, just until the topping is golden brown and bubbly. Let it cool for about 10 minutes before serving so it doesn't fall apart.

Nutrition

Calories: 380kcalCarbohydrates: 45gProtein: 12gFat: 16gSaturated Fat: 9gCholesterol: 185mgSodium: 280mgPotassium: 240mgFiber: 2gSugar: 35gVitamin A: 15IUVitamin C: 2mgCalcium: 20mgIron: 8mg

Notes

Substitutions: If you are dairy-free, swap the milk for almond or oat milk and use a coconut-based cream. You can also reduce the sugar in the custard by half if you prefer it less sweet, but keep the brown sugar topping as is for that caramel kick.
Storage: This recipe is best eaten fresh from the oven, but leftovers keep well covered in the fridge for up to 3 days. Reheat slices in a toaster or microwave for a quick fix.
Serving Suggestions: Serve with a drizzle of maple syrup, a scoop of vanilla bean ice cream, or a side of fresh berries and whipped cream. It is the ultimate comfort food!

Tried this recipe?

Let us know how it was!

Chipotle Sweet Potato, Spinach, and Black Bean Tamales

0
Chipotle Sweet Potato, Spinach, and Black Bean Tamales — Fresh homemade recipe photo
Chipotle Sweet Potato, Spinach, and Black Bean Tamales — Haley's Kitchen

Chipotle Sweet Potato, Spinach, and Black Bean Tamales

If you've ever looked at a box of frozen tamales and thought, "I just want the filling to be this good," you are in the right place. These chipotle sweet potato tamales are my absolute favorite make-ahead meal for busy weeknights because they taste even better the next day. I love that they feel like a hearty Mexican street food comfort dish but come together with such simple, accessible ingredients right in your own kitchen. The secret to getting those beautiful, pillowy casings without hours of standing at the stove? Let the corn masa rest for at least 15 minutes before you start filling them; it makes the dough much easier to handle and prevents tears when you're rolling it out.
The filling is a vibrant mix of creamy roasted sweet potatoes, tender wilted spinach, smoky black beans, and a generous kick of chipotle peppers in adobo sauce that ties everything together with deep, complex heat. You can absolutely use store-bought masa if you are short on time, but I highly recommend using fresh masa harina if you can find it—it has a slightly nuttier flavor and a smoother texture that really elevates the dish. Just remember to let your family know these are best enjoyed warm; the contrast between the hot, savory filling and the soft, chewy husk is just irresistible.
Prep Time 40 minutes
Cook Time 1 hour
Total Time 1 hour 40 minutes
Servings: 8 servings
Course: Side Dish
Cuisine: Mexican

Ingredients
  

For the Chipotle Filling:
  • 3 large sweet potatoes about 1 lb peeled and cubed
  • 2 tbsp olive oil divided
  • 1 tsp ground cumin
  • ½ tsp dried oregano
  • 1 clove garlic minced
  • ½ cup fresh spinach roughly chopped
  • 1 15 oz can black beans rinsed and drained
  • 2 tbsp chipotle peppers in adobo sauce finely chopped (adjust to heat preference)
  • 1 tsp honey or agave syrup
  • Salt and freshly ground black pepper to taste
For the Masa & Assembly:
  • 1 15 oz can yellow corn masa harina, plus extra if needed
  • 2 cups warm water or chicken/vegetable broth for more flavor
  • 1 large sheet dried white corn husks soaked in warm water, or 6-8 large banana leaves as an alternative
  • 1 tbsp vegetable oil plus extra for brushing

Method
 

  1. Roast the Sweet Potatoes: Preheat your oven to 400°F (200°C). Toss the cubed sweet potatoes with 1 tablespoon of olive oil, cumin, oregano, garlic, salt, and pepper on a baking sheet. Roast for 25-30 minutes, flipping halfway through, until they are tender when pierced with a fork but not falling apart.
  2. Make the Filling: While the potatoes roast, heat a large skillet over medium heat. Add the black beans and chipotle peppers; warm them through for 3-4 minutes until fragrant. Once the sweet potatoes are done, remove them from the oven and let them cool just enough to handle. Transfer everything (potatoes, beans, chips) to a large bowl. Stir in the chopped spinach until it begins to wilt from the residual heat, then mix in the honey to balance the spice. Season with salt and pepper.
  3. Prepare the Masa Dough: In a medium mixing bowl, combine 1 cup of masa harina with 1½ cups of warm water. Stir vigorously until smooth; add more water or flour as needed to achieve a soft, pliable dough that isn't too sticky (think Play-Doh consistency). Cover and let it rest for at least 15 minutes—this is crucial for developing the gluten in the corn starch so your tamales hold their shape.
  4. Soak the Husks: While the dough rests, place your dried corn husks (or banana leaves) in a large bowl of warm water and let them soak for at least 30 minutes. They need to be completely pliable so they don't crack when you wrap the tamales.
  5. Fill and Wrap: Remove a soaked husk from the water, shake off excess moisture, and lay it flat on your work surface. Using your hands, scoop about 2-3 tablespoons of the sweet potato filling into a small mound in the center of the husk. Carefully fold the bottom corner up over the filling, then fold the sides inward to create a neat triangle or cylinder shape, tucking the ends in tight.
  6. Cook the Tamales: Arrange your wrapped tamales in a single layer inside a large Dutch oven or deep baking dish. Brush the tops lightly with oil. Pour 1 cup of water into the bottom of the pot (do not let the water touch the tamales directly). Cover tightly with a lid and foil to trap steam. Bring to a boil on high heat for 10 minutes, then reduce heat to low and simmer gently for 45-60 minutes.

Notes

Haley's Kitchen Tips & Notes:
You can make these up to 3 days in advance! Just store them covered in the refrigerator; they actually taste richer after sitting. To reheat, simply microwave for 60-90 seconds wrapped in a damp paper towel or steam them briefly.
If you want to dial up the spice, swap half the black beans for diced roasted red peppers and add a pinch of cayenne pepper to the filling mix. Serve with a dollop of creamy avocado crema or fresh salsa verde on the side for a burst of freshness against the smoky filling.

Tried this recipe?

Let us know how it was!

Seeded Popovers

0

Seeded Popovers

There is something incredibly magical about pulling a tray of popovers out of the oven. They rise tall and proud, with crusty, golden-brown tops that shatter when you bite into them to reveal a soft, steamy interior.
Prep Time 25 minutes
Cook Time 40 minutes
Total Time 1 hour 5 minutes
Servings: 6 servings
Course: Brunch
Cuisine: American
Calories: 320

Ingredients
  

For the Batter
  • 3 large eggs eggs
  • 1.25 cups whole milk or your favorite dairy-free alternative
  • 0.5 cup unsalted butter melted and slightly cooled
  • 2 cups all-purpose flour
  • 1 tsp kosher salt
  • 0.5 tsp freshly ground black pepper
  • 1 cup pepitas pumpkin seeds, lightly toasted
For the Butter & Sugar Topping
  • 3 tbsp unsalted butter softened
  • 1 tbsp granulated sugar optional, but recommended for that sweet-savory balance

Method
 

  1. Prep Your Pan: Preheat your oven to 425°F (218°C). While the oven heats up, melt the butter for the batter and let it cool slightly so it's warm but not scalding hot. Generously grease a popover pan or a muffin tin with high sides using the remaining melted butter—you want a good coating!
  2. Mix Dry Ingredients: In a medium bowl, whisk together the flour and salt until well combined. Set aside.
  3. Whisk Wet Ingredients: In a large mixing bowl (or a stand mixer fitted with the whisk attachment), beat the eggs until they are fully broken up and slightly pale. Slowly pour in the milk and the cooled melted butter while beating continuously. Whisk vigorously for about 1–2 minutes until the mixture is smooth, glossy, and completely free of lumps.
  4. Combine: Add the flour mixture to the wet ingredients in two or three additions, alternating with splashes of cold water if you like a looser batter (though not strictly necessary). Fold gently just until the flour disappears; do not overmix. Stir in the toasted pepitas.
  5. The Rest Period: Cover the bowl and let the batter sit at room temperature for 30 minutes. This is crucial! It ensures your popovers rise tall and don't collapse immediately after coming out of the oven.
  6. Bake: Place the popover pan in the center rack of the preheated oven. Pour the batter into the cups, filling each generously (don't be shy!). Bake for 20 minutes without opening the door.
  7. Finish Strong: After 20 minutes, carefully open the oven door to release some steam, then bake for another 15–20 minutes until the popovers are deep golden brown and sound hollow when you tap the tops with a spoon.
  8. Serve: Remove from the oven immediately. Brush the tops generously with the softened butter and sprinkle with sugar if using. Serve warm!

Nutrition

Calories: 320kcalCarbohydrates: 34gProtein: 7gFat: 15gSaturated Fat: 8gCholesterol: 110mgSodium: 420mgPotassium: 180mgFiber: 2gSugar: 3gVitamin A: 15IUVitamin C: 2mgCalcium: 12mgIron: 4mg

Notes

The secret to getting those dramatic puffs and a perfectly crisp exterior? It's all in the fat-to-flour ratio, but there is one little trick I always share with friends: let your batter rest for at least 30 minutes before baking. This allows the gluten to relax and the starches to hydrate fully, which results in popovers that rise higher and stay tender longer. Plus, tossing a handful of toasted pumpkin seeds (pepitas) into the mix adds a fantastic nutty crunch and makes every bite feel a little more special without adding extra calories.
Substitutions: Feel like using whole wheat flour? Swap half of the all-purpose flour for whole wheat, but be aware it will result in a denser texture. For a dairy-free version, use oat milk and coconut oil or vegan butter.
Storage Notes: Popovers are best eaten warm on the day they are made! If you have leftovers, store them in an airtight container at room temperature for up to 2 days. Reheat in the oven at 350°F (175°C) for 10 minutes to restore that glorious crispness—microwaving will make them sad and soggy.
Serving Suggestions: These are perfect with a simple fruit compote, a side of crispy bacon or sausage, or even just a bowl of warm maple syrup and browned butter. They're also fantastic as a savory breakfast sandwich base!

Tried this recipe?

Let us know how it was!

Pistachio Chocolate Chip Muffins

0

Pistachio Chocolate Chip Muffins

There is something so magical about the smell of fresh muffins baking in the oven on a Tuesday evening. That's exactly when I reach for this recipe! These pistachio chocolate chip muffins are my go-to "weeknight savior." They strike the perfect balance between nutty, earthy pistachios and sweet, melty chocolate chips without feeling like a heavy dessert.
Prep Time 25 minutes
Cook Time 20 minutes
Total Time 45 minutes
Servings: 12 servings
Course: Snack
Cuisine: American

Ingredients
  

For the Pistachio Paste
  • 1 cup raw pistachios shells removed
  • 2 tablespoons unsalted butter for toasting with nuts
  • 1/4 teaspoon sea salt optional, for the nut paste only
For the Muffin Batter
  • 3/4 cup all-purpose flour I like King Arthur for a tender crumb
  • 1 1/2 teaspoons baking powder
  • 1/4 teaspoon baking soda
  • 1/8 teaspoon sea salt
  • 3/4 cup granulated sugar
  • 1 large egg room temperature
  • 1/2 cup whole milk or your favorite dairy-free alternative like oat or almond
  • 2 tablespoons neutral oil like canola or avocado oil
  • 1 teaspoon pure vanilla extract
  • 1/4 cup unsweetened cocoa powder natural or Dutch-processed works best
  • 3/4 cup packed the toasted ground pistachios from above
  • 1/2 cup semi-sweet chocolate chips chopped if you prefer smaller pieces

Method
 

  1. **Prep and Toast:** Preheat your oven to 350°F (175°C). Line a standard 12-cup muffin tin with paper liners or grease them lightly. In a small skillet over medium heat, melt the 2 tablespoons of butter. Add the raw pistachios and toast them, stirring constantly, for about 4–6 minutes until they turn a deeper green and smell nutty (be careful not to burn!). Remove from heat and let cool slightly.
    *Visual Cue:* The nuts should look matte rather than shiny, and you'll hear a faint crackling sound when they are done.
  2. **Make the Pistachio Paste:** Once the nuts are cool enough to handle, transfer them to a food processor or blender. Add the optional pinch of sea salt if using. Pulse until the nuts form a coarse, vibrant green paste with no large chunks remaining. You can also pulse in a small amount of water (1-2 tsp) if your processor struggles, but try not to add too much liquid unless you need it to scrape down the sides. Set aside about 3/4 cup of this paste for the batter; save the rest for eating or sprinkling on top!
  3. **Toast the Chocolate:** While the nuts cool, let the chocolate chips sit in the warm (not hot) oven for 2–3 minutes to just barely soften. This prevents them from melting instantly into a puddle when they hit the batter. Let them cool slightly again before folding in later.
  4. **Mix Dry Ingredients:** In a medium bowl, whisk together the flour, baking powder, baking soda, and salt. Make sure there are no clumps of leavening agents so your muffins rise evenly.
  5. **Combine Wet Ingredients:** In a large mixing bowl (or standing mixer), beat the granulated sugar with the egg until pale and slightly thickened (about 1 minute). Stir in the milk, oil, vanilla extract, and half of the remaining plain flour mixture just to combine. Fold in the cocoa powder gently; the batter will turn a nice brown color.
  6. **Fold it All Together:** Gently fold in the toasted pistachio paste, the softened chocolate chips, and any remaining plain flour until just combined. **Stop mixing immediately!** You want to see streaks of green and brown throughout; overmixing will make the muffins tough rather than tender.
  7. **Bake:** Divide the batter evenly among the 12 muffin cups (they won't rise much higher than a standard loaf due to the cocoa, so don't overfill). Bake for 18–22 minutes.
    *Visual Cue:* The tops should be set and spring back when you gently press the center with your finger. They won't look as golden as vanilla muffins, but they should look firm on top.
    *Temperature Check:* If using an instant-read thermometer, the internal temperature should read 205°F–210°F (96°C–99°C) when inserted into the center of a muffin.

Notes

Here is my one big secret tip that makes these muffins truly stand out: **don't skip toasting the pistachios.** While you can use pre-ground pistachio meal, there is nothing quite like the intense, roasted nut flavor and deep green color that comes from toasting whole nuts before grinding them. It elevates the entire muffin from "cute snack" to "delicious breakfast staple." Plus, toast those chocolate chips for a minute or two while the nuts are in the oven; it ensures they melt slowly rather than burning instantly when they hit the hot batter.
These are perfect for tossing with a little Greek yogurt and honey on the go, or simply slathering with butter and jam if you have a slow morning ahead. They hold up beautifully in the fridge for two days, making them an easy solution for busy weekdays.

Tried this recipe?

Let us know how it was!

No-Bake Chocolate Bottom Pumpkin Tart

0

No-Bake Chocolate Bottom Pumpkin Tart

Friends, gather 'round! If you've ever hesitated to make pumpkin pie because the oven is already baking a casserole or the house smells like burnt sugar from dinner, let me save you some trouble. This No-Bake Chocolate Bottom Pumpkin Tart is my go-to autumn dessert when I want something rich and festive without turning my kitchen into a steam room. It's essentially a truffle-chocolate crust topped with silky pumpkin custard, set in the fridge so it stays perfectly chilled for hours.
I usually whip this up on a Tuesday night after getting the kids tucked in; there is simply nothing better than sinking a spoon into a frozen chocolate shell and finding that velvety orange dream waiting inside. Here is my secret weapon: don't skip the cocoa powder in the crust! It doesn't just add sweetness; it deepens the flavor of the chocolate so that when you cut through it, you get that perfect balance of dark chocolate and bright pumpkin spice rather than just a sweet cookie shell.
Prep Time 20 minutes
Total Time 4 hours 20 minutes
Servings: 8 servings
Course: Dessert
Cuisine: American
Calories: 310

Ingredients
  

For the Chocolate Crust
  • 1 cup 130g high-quality semi-sweet chocolate chips (or chopped bars)
  • ½ cup 120ml heavy whipping cream
  • ¼ cup 40g unsweetened cocoa powder
  • ¾ cup 150g graham cracker crumbs (about 10-12 full sheets crushed)
  • â…“ cup 65g granulated sugar
  • ½ teaspoon fine sea salt
For the Pumpkin Filling
  • 1 can 15 oz / 438g pumpkin puree (make sure it's not pie filling!)
  • 2 large eggs room temperature
  • ½ cup 100g granulated sugar
  • ¼ cup 60ml heavy whipping cream
  • ½ teaspoon pure vanilla extract
  • ½ teaspoon ground cinnamon
  • ¼ teaspoon ground ginger
  • ¼ teaspoon ground nutmeg
  • 1 pinch salt

Method
 

  1. Line an 8-inch tart pan or a small springform pan with parchment paper. In a microwave-safe bowl or saucepan over low heat, melt the chocolate chips and heavy cream together until smooth. Stir in the cocoa powder until you have a rich, dark ganache. Let this cool slightly but stay pourable.
  2. Mix the graham cracker crumbs, sugar, and salt in a small bowl. Pour about two-thirds of the chocolate mixture into a separate container (you'll need to save the rest for drizzling later). Stir the dry crumbs into this portion until well combined. Press this mixture firmly into the bottom and up the sides of your prepared pan. Chill in the fridge for 15 minutes while you make the filling.
  3. In a medium bowl, whisk the eggs and sugar together until pale and thick. Stir in the pumpkin puree, vanilla extract, heavy cream, cinnamon, ginger, nutmeg, and salt. Scrape this mixture into your chocolate crust (which is still cold in the fridge).
  4. Place the tart in the refrigerator for at least 4 hours, or preferably overnight. This is crucial! You want the chocolate bottom to firm up enough that it doesn't slide when you cut it, and the pumpkin filling needs time to set into a custard-like texture.
  5. About 10 minutes before serving, drizzle the remaining reserved chocolate mixture over the top of the tart in swirls or lines. Garnish with a dusting of cocoa powder or shaved white chocolate if you're feeling fancy. Slice and serve!

Nutrition

Calories: 310kcalCarbohydrates: 38gProtein: 5gFat: 16gSaturated Fat: 9gCholesterol: 75mgSodium: 140mgPotassium: 210mgFiber: 3gSugar: 28gVitamin A: 25IU

Notes

Kitchen Tips & Swaps
  • No Crust? If you don't have graham crackers, fine chocolate cookie crumbs or even a nut-based crust (like crushed Heath bars with walnuts) works beautifully here.
  • Make it Vegan? Use a dairy-free cream for the ganache and fillings, plant-based milk in place of heavy cream, and ensure your eggs are replaced with a flax egg if needed. The texture will still be divine!
  • Storage: Keep this tart covered in the fridge for up to 3 days. It actually tastes even better the next day as the flavors meld together.
  • Serving Suggestion: This is rich enough on its own, but a tiny scoop of vanilla bean ice cream or a dollop of whipped cream makes it feel like a true indulgence.
Enjoy your autumn treat! Let me know if you try my chocolate drizzle trick—I promise you won't regret it.

Tried this recipe?

Let us know how it was!

Pretty, Yummy Fruit Salad

0
Pretty, Yummy Fruit Salad — Fresh homemade recipe photo
Pretty, Yummy Fruit Salad — Haley's Kitchen

Pretty, Yummy Fruit Salad

There is something genuinely magical about the way different fruits dance together on a plate. I love this fruit salad because it's not just a side dish; it's a mood lifter. Whether you're coming home from a long week at work or hosting friends who need a bright, refreshing palate cleanser after dinner, this bowl brings instant joy to the table. It's vibrant, slightly sweet, and packed with textures that make every spoonful interesting.
Prep Time 15 minutes
Total Time 15 minutes
Servings: 5 servings
Course: Side Dish
Cuisine: American
Calories: 185

Ingredients
  

The Fresh Mix
  • 4 cups fresh strawberries hulled and sliced into quarters
  • 3 large ripe bananas peeled and sliced (or frozen if you prefer a colder salad)
  • 2 cups pineapple chunks fresh is best for sweetness, canned works in a pinch
  • 1 cup grapes stemmed and halved
  • 1/2 cup red onion very thinly sliced (optional, adds a savory crunch—omit if picky!)
  • 1/4 cup fresh mint leaves loosely packed
The Dressing & Finish
  • 1/3 cup honey or maple syrup to taste
  • 2 tablespoons fresh lime juice
  • 1/2 teaspoon vanilla extract
  • 1 pinch sea salt generous

Method
 

  1. Start by taking a large mixing bowl. Place your handful of fresh mint leaves at the bottom. If you are using red onion, add it now too; its sharp flavor won't bleed into the other fruits if added early.
  2. Using the back of a sturdy wooden spoon or a muddler, gently press down on the mint (and onion) to bruise them slightly. You want to see the green oil bloom and release, but don't shred the leaves! This step creates the perfume for your salad.
  3. Toss in your strawberries, sliced bananas, pineapple, and grapes. If using frozen fruit, thaw it briefly so it's not icy cold, which can dilute the dressing too much.
  4. In a small jar or separate bowl, whisk together the honey (or maple syrup), fresh lime juice, vanilla extract, and a tiny pinch of sea salt until the sweetener is mostly dissolved.
  5. Pour the dressing over the fruit mixture. Gently fold everything together with your hands or a large spatula until every piece of fruit is lightly coated. Taste it! If you want more zing, squeeze in a bit more lime; if you need more sweetness, add another drizzle of honey.
  6. This salad is best eaten fresh to keep those banana slices from turning brown and the grapes crisp. Scoop into bowls or arrange directly on a platter for serving.

Nutrition

Calories: 185kcalCarbohydrates: 48gProtein: 2gSodium: 15mgPotassium: 420mgFiber: 4gSugar: 42gVitamin A: 8IUVitamin C: 65mgCalcium: 12mgIron: 10mg

Notes

The secret to making this "pretty" part really pop? Don't skip the muddle step! Take a moment to gently crush your mint leaves (and maybe a hint of lime zest) in the bottom of your bowl before adding the fruit. This releases the essential oils and gives the whole salad an incredible aromatic kick that you won't even realize you need until you take that first bite. It transforms a simple mix of produce into something that feels like a high-end dessert without any actual sugar added.
Storage Notes: Keep this in an airtight container in the fridge for up to 4 hours. After that, the bananas will brown and the grapes may get mushy. For longer storage, keep the fruit and the dressing separate until ready to serve!
Substitutions: Feel free to swap in melon cubes (watermelon or cantaloupe), kiwi slices, or even fresh figs if they are in season. Just avoid adding anything with a strong "meaty" texture like pineapple that has been sitting out for too long.
Make it Vegan: Simply skip the vanilla extract (use vanilla bean paste instead) and ensure your honey is swapped for maple syrup or agave nectar if you prefer plant-based options.
Serving Suggestion: This pairs beautifully with a light grilled chicken breast, a crisp cucumber salad, or even as a standalone dessert topped with a dollop of Greek yogurt if you're feeling indulgent!

Tried this recipe?

Let us know how it was!

Glazed Easter Ham

0

Glazed Easter Ham

There is something so magical about the smell of a glazed ham filling the house on Easter Sunday. It's not just a holiday tradition for me; it's my way of saying "hello" to friends and family I love. This isn't your boring, plain-from-the-store slice; this is a golden-brown centerpiece that will have everyone reaching for seconds before they even realize what hit them.
Prep Time 15 minutes
Cook Time 1 hour 45 minutes
Total Time 2 hours
Servings: 8 servings
Course: Main Dishes
Cuisine: American
Calories: 420

Ingredients
  

For the Ham
  • 1 fully cooked spiral-sliced bone-in ham approx. 8 to 10 lbs
  • 2 tbsp unsalted butter softened
  • Fresh rosemary sprigs optional, for garnish
For the Sticky Glaze
  • 1 cup packed light brown sugar
  • 0.5 cup honey
  • 0.25 cup Dijon mustard
  • 2 cloves garlic minced very finely
  • 1 tsp fresh ground black pepper
  • 0.5 tsp sea salt or to taste

Method
 

  1. Preheat your oven to 325°F (165°C). Take your spiral-sliced ham out of the packaging and remove any plastic wrapping or cardboard discs from the top. Pat the entire surface dry with paper towels; this is crucial so the glaze can stick properly.
  2. In a small bowl, whisk together the brown sugar, honey, Dijon mustard, minced garlic, black pepper, and salt until it forms a thick, sticky paste. You want to ensure there are no clumps of sugar, as those won't melt evenly in the oven.
  3. Gently spread about two-thirds of the glaze mixture over the top and sides of the ham. Since this is spiral-sliced, try to get into the crevices between the slices without pushing the meat around too much. Tuck any loose rosemary sprigs into the center if you are using them.
  4. Place the ham in a large roasting pan (or a rimmed baking sheet). Bake for approximately 10 to 12 minutes per pound. For an 8-10 lb ham, that's roughly 1 hour and 30 minutes to 2 hours total.
    Visual Cue: You are looking for the glaze to turn a deep golden brown and become bubbly around the edges. The internal temperature of the thickest part (avoiding the bone) should reach 140°F. Since it's fully cooked, we only need to heat it through; if you go past 150°F, the sugars in the glaze will start to burn before the meat is warm enough.
  5. About 30 minutes before the ham is done, remove it from the oven. Brush on the remaining glaze mixture. Return the ham to the oven for those final 30 minutes. This second application creates that signature hard, shiny shell that holds up beautifully when you carve it.
  6. Once the timer goes off and the temperature hits your target, remove the ham from the oven. Let it rest on a cutting board or warm platter for at least 15 to 20 minutes. This allows the juices to redistribute so every slice stays moist. Slice between the spiral lines (or straight across the bone if you prefer larger chops) and serve immediately with your favorite mashed potatoes or green beans.

Nutrition

Calories: 420kcalCarbohydrates: 35gProtein: 28gFat: 18gSaturated Fat: 7gCholesterol: 95mgSodium: 1450mgPotassium: 600mgSugar: 28gVitamin A: 2IUVitamin C: 3mgCalcium: 4mgIron: 6mg

Notes

One tip that makes a *real* difference here is to buy a fully cooked, bone-in ham. It saves you from having to cook the meat for hours (which can dry it out) and lets you focus entirely on making that beautiful glaze stick. Just remember: if you use a pre-cooked ham, you are essentially reheating it in a honey bath! Don't overcook it, or you'll end up with rubbery meat instead of tender, juicy slices perfect for your family gathering.
Kitchen Notes & Tips:
- **Substitutions:** If you're out of honey, maple syrup or agave nectar works great (though the flavor will shift slightly). For the mustard, yellow mustard is traditional, but Dijon adds a nice tang that cuts through the sweetness.
- **Storage:** Leftovers are delicious! Store any remaining ham in an airtight container in the fridge for up to 3 days. Reheat gently in the oven at 275°F with a splash of broth or water to keep it from drying out.
- **Make Ahead:** You can brush the initial layer of glaze on the day before, cover tightly with foil, and store in the fridge. Just remember to remove the foil and add the final glaze right before baking to ensure that perfect caramelization.

Tried this recipe?

Let us know how it was!